It’s time to look at a new system as we explore the Signal Results Grid in more detail. It’s not necessary to type in all the code this time. We’ve done it for you.
| 1 | From the File menu, choose Open, Signal Rules (or click on the Open Existing Signal Rules icon on the Signal bar.) |
| 2 | The file should be located in ..\Mechanica\Sample Rules\Signal Rules |
| 3 | Choose Lesson3.sig from the dialog box. |
We’ve taken the system developed in Lessons 1 & 2, and turned it around. We’re still using all the same indicators, but we’ve flip-flopped their utility; the entries are now the exits, and vice-versa. In addition, all the parameter values, or look back periods, have been changed to a uniform 34 days.
![]()
SYSTEM = 3
COL1 = MAX[HIGH, 34, 0] + TICK[1] 'long entry price
COL2 = MIN[LOW, 34, 0] - TICK[1] 'short entry price
COL3 = SMA[CLOSE,34] 'exit indic. (long and short)
![]()
BUYSTOP = COL1[1] 'long entry signal
SELLSTOP = COL2[1] 'short entry signal
![]()
IF C[1] < COL3[1] THEN SELLOPEN 'long exit signal
IF C[1] > COL3[1] THEN BUYOPEN 'short exit signal
Discussion
Our new system enters today on the penetration by a single tick of the N-day “channel breakouts” in Columns 2 & 3, yesterday. These N-day channels were employed as exits in our earlier system. The exit is now a simple moving average, defined in Column 1. It was previously used as an entry signal.
It’s really quite simple. The previous system required a close above or below the moving average yesterday to enter long or short today, and exited on stop orders. This system enters on stop orders, but requires a close above or below the simple moving average yesterday, to exit on the open today.
|
As you may have noticed, the terminology surrounding trading system related concepts is far from consistent. Here’s a quick overview of the various forms it can take. Each indicator in a trading system is actually a system variable, more commonly referred to as a parameter. The phrase parameter value, then, refers to the input value(s) of the indicator. Parameters often have more than one input value (or argument, in programming lingo), which may or may not be numeric: COL1 = SMA[CLOSE,34]
The Mechanica Basic indicator in the statement above is Simple Moving Average. It has two arguments. The first is price (Open, High, Low, Close). The second is a numeric (34, in this case), which specifies the number of trading days over which the indicator looks back in time to gather the data needed for its computation (hence, the phrase look back period). Here’s how you’d discuss the concept with a programmer: SMA is a function (which means, simply, that it returns a value). Its syntax is of the form SMA[p,n]. It has two arguments (p and n), where p stands for price, and n represents the number of days over which the simple moving average of prices is to be calculated. |
Running the new system (Lesson 3.sig)
| 1 | From the Data menu, choose Symbol Manager. |
| 2 | Make sure that the Pinnacle_Futures Data Page is selected (checked). It should still be tagged from the previous lesson. |
| 3 | Under the Tag Symbols tab, untag the second British Pound symbol (price file) BP_B_REV. It should still be tagged from the previous exercise. |
| 4 | Tag the Japanese Yen symbol (JY_REV). |
| 5 | Close the Symbol Manager. |
| 6 | From the Signals menu, choose Run Signal Rules to run the system. |
As discussed previously, grid-column aliases allow you to assign descriptive, plain English labels to the column headings in the Grid. The use of (such) aliases makes your code clearer and easier to read, and makes troubleshooting...less troublesome.
Aliases:
| n | can be user-defined |
| n | are automatically declared as variables upon creation |
| n | can be directly referenced, or assigned values in your system code |
Creating an alias is easy: Just select a column number from the drop-down list box, enter the desired alias in the edit text box to the right, and press OK. The alias will appear under the Col N heading. It can then be referenced in your code. There are a couple of rules to keep in mind, so we’ll go through the process step-by-step.
| 1 | Open Lesson3.sig if it is not already open, and refresh your memory of how the system enters and exits trades. |
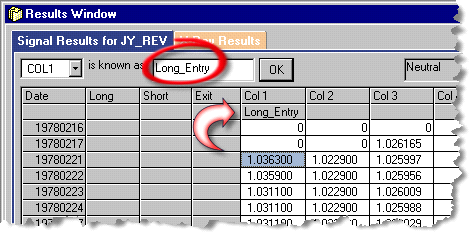
| 2 | Run the system. Note that the active cell defaults to Col 1, as does the drop-down listbox in the upper left-hand corner (above Date). |
| 3 | Place your cursor in the edit-text box to the left of the OK button (circled). |
| 4 | Type “Long_Entry” as shown below. (Be sure to include the underscore.) |
| 5 | Press OK. |
| 6 | The alias should now appear, immediately under Col 1. |

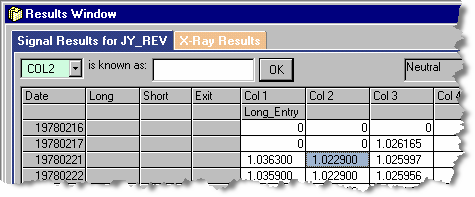
| 7 | Press Right Arrow once to position the cursor in Col 2. As you do, note that (a) the drop-down list box changes to display COL2, and (b) the edit-text box is now blank, and ready to accept an alias. |
| 8 | Place your cursor in the edit-text box. |
| 9 | Type “Short_Entry” (be sure to include the underscore)...and click OK. |

| 10 | The alias “Short_Entry” should now appear under Col 2 (not shown here). |
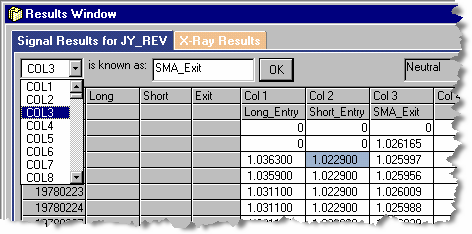
| 11 | Press the arrow on the drop-down list box (shown below, expanded). |

| 12 | Select COL3. The list box will collapse after you make your selection. |
| 13 | In the edit-text box, type “SMA_Exit” ...and click OK. |
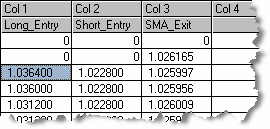
| 14 | All three grid-column aliases should now appear on your screen as they do in the graphic above. (The drop-down list box is expanded for the sake of illustration.) |
| 15 | Save your work. |
| 16 | Grid-column aliases are uniquely associated with the SIG file open at the time of their creation, and are stored and saved along with the Signals code. So go ahead and save your work now. |
| • | If a SIG file contains grid-column aliases, and you save it out to another filename (Save As, Signal Rules, under the File Menu) the grid-column aliases will be transferred along with the rest of the Signals code. |
| 17 | Now that we’ve learned how to assign grid-column aliases to the column headings in the Grid, we’ll take a step-by-step look at how to employ them in a SIG file, to make your code clearer and easier to read. |
|
|
To reference a grid column alias in your code
It’s important to note that, as soon as grid-column aliases are created, they are automatically declared as variables (internally by Mechanica), and are immediately available to be used in your system code. It may sound complicated, but it’s not. Basically, it means that you can substitute an alias for the column it represents, wherever that column is referenced in your code.
In this exercise, we’re going to substitute the appropriate alias in every instance that a COL definition is referenced on either the Trade Entry or TIP & Exit page.
| 1 | Open Lesson3.sig, if it is not already open. The aliases you created in the previous exercise should appear as they do below. (If you experience any difficulties, open Lesson3a.sig, which replicates Lesson3.sig as we last left it.) |

| 2 | Edit Lesson3.sig, as shown below. In each case, the original Mechanica Basic statements have been commented out, and replaced with logically equivalent statements using the appropriate grid-column alias. (The Resources page is not shown because nothing on it has changed.) |
![]()
'BUYSTOP = COL1[1] 'long entry signal
BUYSTOP = Long_Entry[1]
'SELLSTOP = COL2[1] 'short entry signal
![]()
SELLSTOP = Short_Entry[1]
'IF C[1] < COL3[1] THEN SELLOPEN 'long exit signal
IF C[1] < SMA_Exit[1] THEN SELLOPEN
'IF C[1] > COL3[1] THEN BUYOPEN 'short exit signal
IF C[1] > SMA_Exit[1] THEN BUYOPEN
| 3 | Save your work. |
| 4 | Click the Run arrow on the Signal toolbar to run the modified Signal Rules file, Lesson3.sig. Provided there are no errors in your work, this system should run as it did before, and produce identical results |
Note that aliases are treated just like the Column definitions they represent, including the use of day offsets, which are employed in both the entry and exit statements above. Thus, these new statements are functionally and logically equivalent to the original statements they replaced.
The choice of whether to use conventional syntax or grid-column aliases is strictly a matter of preference. Ultimately, though, as your programs grow, aliases can make your code clearer and easier to understand, almost to the point that you can dispense with the practice of commenting your work.
To create an alias without defining a Column first
Cementing the relationship between aliases and the grid-columns they represent was the best way to introduce the concept. However, it isn’t mandatory for a Column to be defined in a SIG file, before an alias is assigned to it.
For example, you may choose to display the daily Open, High, Low and Closing prices in columns 4 – 7 of the Grid. If so, then...

| • | Simply create the appropriate aliases, as shown above. It is illegal to use a Mechanica Basic keyword as an alias, so be certain that you add the underscore. |
| • | Then, in order to populate the Grid with the prices that correspond to these new aliases, you would simply add the following bank of statements at the end of the Resources page of your SIG file: |
![]()
SYSTEM = 3
COL1 = MAX[HIGH,34,0] + TICK[1] 'long entry price
COL2 = MIN[LOW,34,0] - TICK[1] 'short entry price
COL3 = SMA[CLOSE,34] 'exit indic. (long and short)
'
O_ = O 'opening price
H_ = H 'high price
L_ = L 'low price
C_ = C 'closing price
![]()
In Mechanica Basic, price-related keywords have an abbreviated form (used above), and a verbose form, shown below. They are equivalent, so the form you chose is a matter of preference:
O_ = OPEN 'opening price
H_ = HIGH 'high price
L_ = LOW 'low price
C_ = CLOSE 'closing price